Dotyczy to również części drzwiowej.
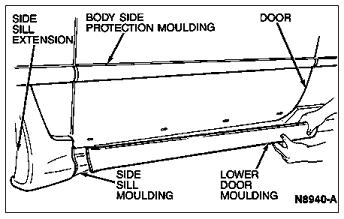
Moulding, Body Side Protection -- Stick-on Type
Removal
1. Completely clean the sheet metal surface area around the moulding with isopropyl alcohol and a clean soft cloth.
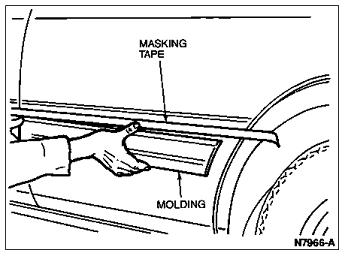
2. Before removing the moulding or nameplate, mark its location on top and at each end using masking tape.
NOTE:
Heating the moulding nameplate or sheet metal will increase adhesion making it hard to remove. Cold temperatures of zero and below allow easier removal.
3. When removing mouldings, use a nylon wedge. Position the nylon wedge between the moulding and sheet metal and pull the moulding away with steady tension.
4. Remove and replace one moulding at a time.
5. Once a few inches of moulding are free, grip it with both hands and pull it slowly toward the front of the vehicle. Be careful not to damage the paint or sheet metal.
6. All of the adhesive tape will not come off with the moulding. White or gray acrylic tape can be removed by gently stretching it.
7. Grip tape at one end, lifting and pulling away slowly about 1/2 inch at a time. Small pieces can be removed by rolling with your thumb across the sheet metal surface.
Installation
1. When all tape is removed, wipe area with isopropyl alcohol and a clean soft cloth. Make sure that all tape residue and road dirt is removed. Use soap and water to finish cleaning the surface prior to installing the tape or moulding.
2. If paint surface is damaged during moulding removal, repair as required.
3. Apply the new moulding by pulling back adhesive tape protective cover about 3 to 4 inches at the front edge of the moulding. Do not touch or contaminate tape surface.
4. Align the new moulding with the masking tape applied during the removal procedure and gently press, removing the protective cover as you proceed forward.
5. Be sure that the moulding is lined up correctly; once the tape sticks the moulding cannot be removed.
NOTE:
Mouldings should not be installed on vehicles unless sheet metal surface temperatures exceed 80°F (27°C) and the moulding is at 70°F (21°C) minimum.
6. Remove the masking tape and wipe the area under the masking tape with isopropyl alcohol to remove residue.
7. Press the moulding on with a hand roller applying a minimum of 20 psi pressure to make sure of proper adhesion.
Źródło: Ford Technical Service Information - Electronic Publications